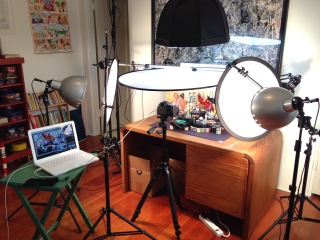
In part one of this long overdue update on my creative exploits for 2015, I filled everyone in on the totally mundane effort of cleaning out and reorganizing my studio — a rite of well-meaning passage for pretty much every artist. One would think that a clean well-organized studio would immediately send creative bolts of electricity through an artist and see him or her instantly filled with motivation to create amazing new works of art. In my case, wrong. A clean studio was merely the first step in my 2015 Art Career reboot, and in Part Two of my three (or maybe four) part update on 2015 I’m going to talk about the next step.
If it ain’t broke… it probably is, so buy all new equipment!
The studio process for creating my images has remained relatively unchanged for the past 7 years. I’ve used the same 10 megapixel Canon XTi purchased in 2007, shooting scenes setup inside a 30″ light tent surrounded by three 500 watt photo flood lights. The tent has always provided really great light, and it made a huge difference in my work when I began getting more serious about creating art in 2007. However, this magical little studio cube has a few shortcomings:
- The size of the tent limits the size of the pieces I’m able to create.
- The tent itself is very confining and it is very difficult to contort my hands, arms, and (quite often) the upper half of my body deep into the tent to make small stage adjustments without bumping the camera, tripod, or precariously balanced objects already in the scene. Disasters are routine. My work is fraught with the perils of alphabet avalanches, and album covers that topple over in an earthquake of pop culture destruction.
These problems are magnified by a factor of about a thousand when creating videos or stop motion animation. Once the tripod is nudged, or the camera is jostled, hours or even days can pass before I’m able to accurately get everything back where it was. Take a look at just a few short moments to shoot a single frame of stop motion animation.
See? What a pain! So that was the old process. To make things a little easier on my back, my neck, and my patience, I wanted to make the task of building and animating my stage sets much less constrictive, but still have the benefits of enjoying 1500 watts of glorious light. Basically, I wanted 360 degree access to the stage set; if a little plastic Jesus decided to fall behind a stack of books, or a plastic sheep plummeted through the hole in a vinyl 45, I wanted at least a fair chance to retrieve the fallen character without having to rip apart large portions of the construction. So… no more light tent.
No more light tent?!?! But what about all that “glorious light” you’re always bragging about? How in the world are you going to replace that? Huh, Mr. Barely-knows-how-to-use-his-camera?
Patience, please! I didn’t say I was eliminating the light, I was just eliminating the tent. Eliminating the tent, however, meant I’d no longer have the lazy benefit of light bouncing all over the place off of the reflective white fabric. The tent made lighting super easy. Just place a floodlight on the left, another on the right, and hang one more over the top and let the laws of physics take care of everything else. Replacing the tent just meant that I’d have to be a lot more strategic about how my pieces would be lit.
The first step in replacing the light tent was to provide a simple workplace that would give me access to the scene from any direction, so I just laid down a large piece of black posterboard where the tight tent would have normally sat, and erected a sheet of white foam core to act as a visual backdrop, as you see to the left during the initial stages of setting up the first new photo I created with my new equipment. Without the constraints of the light tent, I now had access to the scene construction from all around the table (which actually stands about a foot away from the wall).
Quick Note You see five light sources in the photo above: two photo flood lights, a brand new LED soft box, and a pair of desk lamps. The desk lamps are used to provide illumination to the scene during stage construction; they are turned off when I’m taking photos.
The soft box is now used as my primary light source, providing soft, even light from above. With the lamp mounted to a sturdy boom, I can easily adjust the height up or down to get the coverage a given scene might need. Best of all, the soft box can be moved away entirely so I can easily change the composition of a scene without risk of upsetting the whole cart of apples — something that was not possible within the light tent.
But wait! Just like Ginzu Knives… that’s not all!
To supplement the soft box I retained the original 500 watt photo flood lights, but front those with a couple of 20″ translucent diffusers to soften the otherwise harsh light produced by the floods, as seen on the right. Positioning the lights and diffusers is super easy, so I can get the same level of “coverage” formerly available in the light tent, while again having the luxury of moving all of the lighting out of the way to dig into the construction.
Wait! What about that really BIG diffuser you have hanging over the entire scene? It looks like you have even less space than you did with the light tent! And why even use a diffuser and the soft box IS a diffuser? How about that, smart guy!
Very observant, and, true! Suspending that large disc over the whole scene made it virtually impossible to make any more changes to the scene you see buried beneath all those discs and lights — which is why the stands, lights and reflectors come in after I’m completely happy with the scene I’ve constructed. As for why the big diffuser is there…
During the shooting of this particular photo, and at the point where I thought I was done, I discovered that the octagonal shape of the soft box was being reflected in each and every bead that had been used within the scene! This hadn’t been a problem with the light tent… and, so, the big 40″ diffuser was brought in to better distribute the light and eliminate the reflections.
Why stop with new lights when your camera is 7 years old?
Exactly! As stated in part one, I’ve been using the same Canon XTi since 2007. By no means has this been a “bad” camera; it’s super easy to use and takes very nice photos. But, over the years, as I’ve continued to develop a technique for creating better images, I’ve found the camera lacking certain efficient features. Most notably:
- Falling behind the megapixel curve. Even though 10 megapixels was a lot in 2007, there are now cellphone cameras that can (badly) capture images at that resolution, and while the number of megapixels may not equate to better pictures, it does limit how large you can effectively print.
- The lack of an LCD view finder that can display a scene “live” as it is being composed. I didn’t mind using the built-in “by sight” view finder, but I’ve always thought it would be easier to see what I was planning on shooting on an LCD display, or…
- …view an interface to an external monitor, a feature the XTi lacks.
- I also felt somewhat constrained by the focusing limitations of the XTi, which provides 9 autofocus points, and for the past few years I’ve been relying more and more on taking multiple shots of the same image, all at different focus points, then “smooshing” those photos together, as layers, to create the final image. I figured, the more autofocus points, the better!
My solution was to take the plunge into much better equipment, so I purchased a new Canon EOS 70D — 20 megapixels instead of 10, 19 autofocus points instead of 9, LCD display with a live mode, and…
Software!
Absolutely the best feature of the new camera is the ability to tether the camera to my MacBook and control every aspect of the camera (aperture, ISO, focusing, pressing the shutter, etc) from my computer, all the while seeing what the camera is seeing on the laptop display! And why is this so cool? Well, let’s take a look at the process I used to take to setup my images using the XTi:
- Setup a scene in my studio (which is outside, across a small patio, in my guest house).
- Take a photo.
- Remove the camera from the tripod, take it into the house and upstairs to my office.
- Plug the camera into my iMac and import the photo into Aperture.
- Analyze the image, writing notes on a scrap of paper: turn yellow kewpie clockwise by a little, nudge blue buddha to the left by a smidgen, replace small goat with small lamb…
- Go back to the studio
- Make the noted changes
- Remount the camera onto the tripod (and hope that it is in the exact same place as it had been when I took the previous photo)
- Take another photo
- Repeat ad infinitum…
Toss in several clumsy disasters dealing with the iron-maiden-like constraints of the light tent, and… well, you get the idea. But with the new camera and Canon’s software, I can see the scene live, zooming around the entire composition to immediately evaluate where one figure stands in relation to all the others. Even better, I can fine tune the focus since the software also allows me to control my L-series lens — and, I’m able to see the eventual histogram in real time, so I can adjust things like the shutter speed or the lighting conditions on the fly to produce the best image possible. Needless to say, this has cut down the above steps drastically! So, does that mean I’m going to be able to produce work faster than in the past? Ha!! Don’t jump to conclusions… We’ll get to that in part three.


[…] Dream Machine Artist Collective Build, Work, Dream, Create — a quick 2015 update (Part Two) […]
[…] « Build, Work, Dream, Create — a quick 2015 update (Part Two) […]